Are you ready to elevate your traditional accounting software? Xero is a cloud accounting software that allows you to do so. It automates accounting procedures with smart automation, effortless integration, and multiple users. Its easy-to-use interface means anyone can use it. In this article, we’re going to go in-depth into Xero’s advanced tips and tricks. These will allow you to get the most out of Xero. Let’s unleash the full power of this fantastic small business accounting software and spur your business growth.
Why is Xero suitable for small businesses?
Xero is an online accounting software that simplifies bookkeeping for small business owners. It contains numerous features that simplify accounting, make it accessible, and scalable with growth. Xero can also function as payroll software. If you want to use Xero with your business, Caltrix Asia can help you to implement it. It is the most time consuming option for new users.
– Automated Accounting Features
Xero enables one to automate invoicing, bank statement reconciliation, and expense tracking. This saves time and human errors through reduced manual data entry.
– Seamless Third-Party Application Integration
Xero has over 800 third-party application integrations, including CRM, web stores, and payroll. Organizations can customize the accounting system based on special requirements.
– Mobile Functionality
Xero mobile application enables one to stay in charge of the money while outside the office or without a desktop computer at hand. Some of the functions include invoicing clients, snapping photos of receipts, and bank transaction reconciliations through tablets or mobile phones with an internet connection.
– Business Expansion Scalability
Xero has solutions that are scalable and can be expanded to suit a business as it expands. The features or interfaces can be added as it expands in a bid to keep up with demand.
– Friendly Interface
Xero offers a user-friendly interface that can be used by even the most inexperienced people with no long accounting experience. Simple design and plain graphics allow for great fiscal control.
– Affordable Pricing Plans
Xero has tiered pricing plans so the company can select a plan by size and requirement. The feature provides that the cloud based accounting software is affordability-friendly and cost effective without compromise at any level of functionality. The monthly subscription fee of Xero starts from RM135, and Xero provides a 30-day free trial to all new users.
Overall, Xero presents an integrated range of tools for making accounting easy, more accessible, and easing the development of small businesses. Its automation capability, integration feature, and interface simplicity ensure that it is a go-to tool for financial management.
9 Advanced Cloud Accounting Features of Xero
1. Choose Discount Type
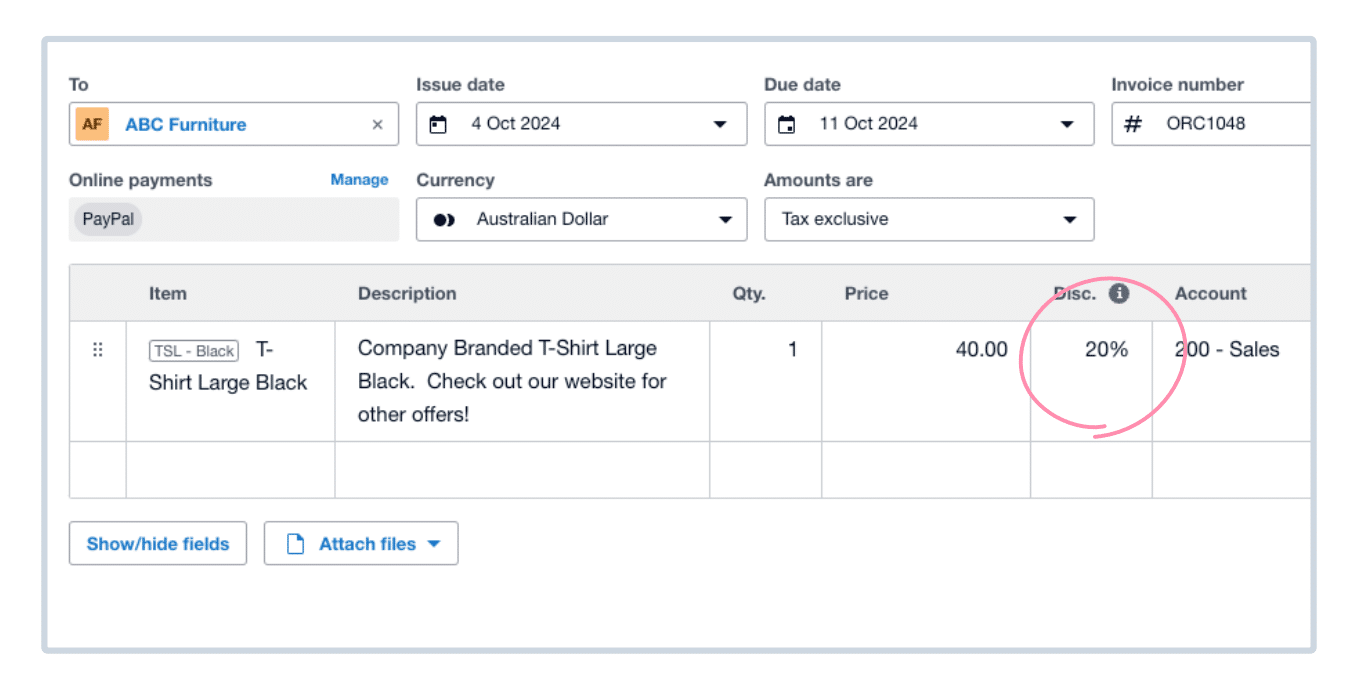
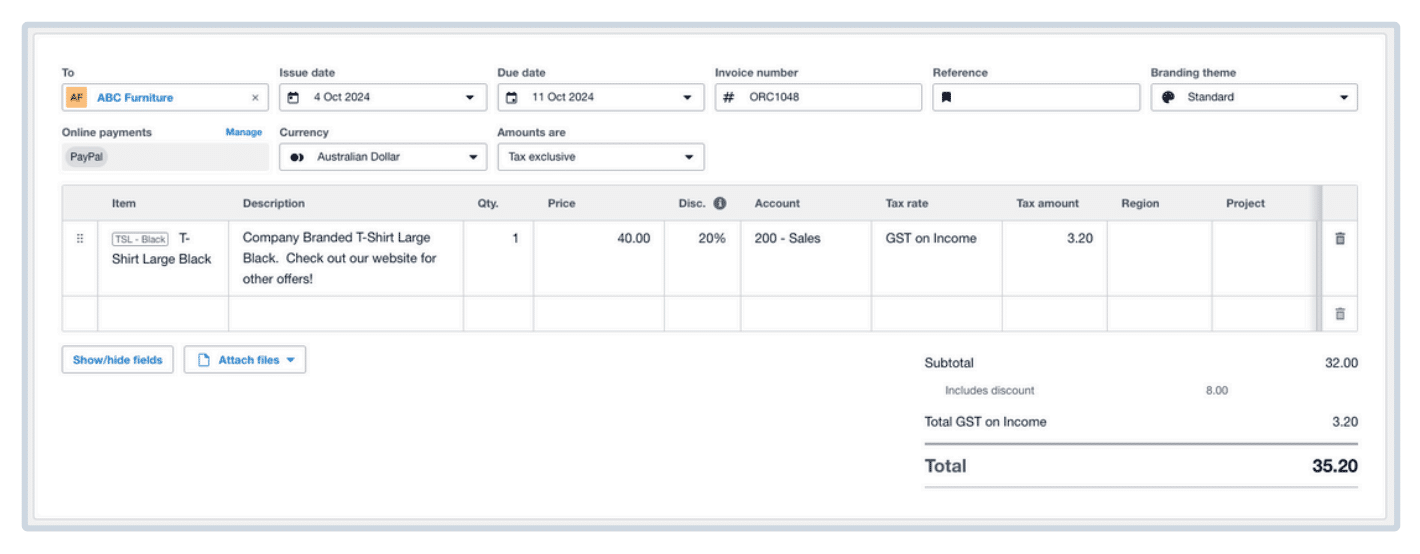
In the new billing of Xero, you have two ways you can add a discount to transactions, as a percentage or the amount.
- For applying the percentage discount, you just input the number followed by the “%” symbol.
- When using the discount by amount, you just type in the amount needed, but without the symbol.
With this kind of flexibility, you will be able to customize discounts according to your requirements. But be aware that the system does not automatically use percentage discounts as a default; you have to manually place the “%” symbol each time.
2. Apply a Discount to the Item
- Go to the Business menu and select Purchase Orders.
- Either select an existing purchase order or click New Purchase Order to create one.
- Enter the relevant details in the respective fields.
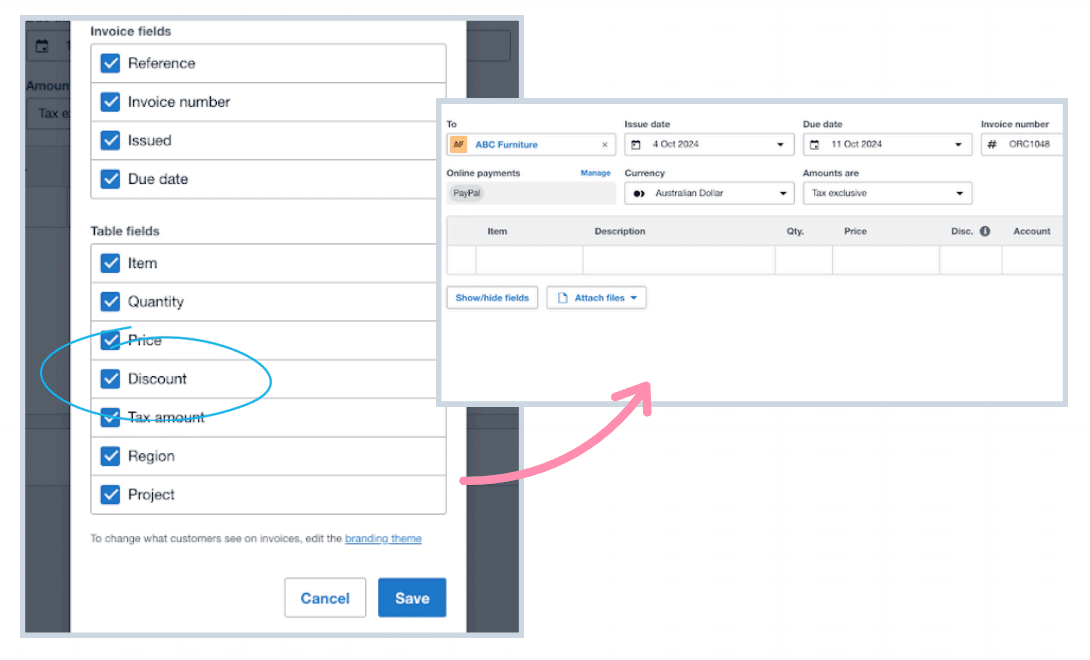
- In the Disc% column, type the discount percentage to be charged on the line item.
- Save, send, or submit the purchase order for approval as needed.
Note: If the Disc% column is not visible, click the Show/Hide button to show it.
3. Use Xero to Xero Invoicing
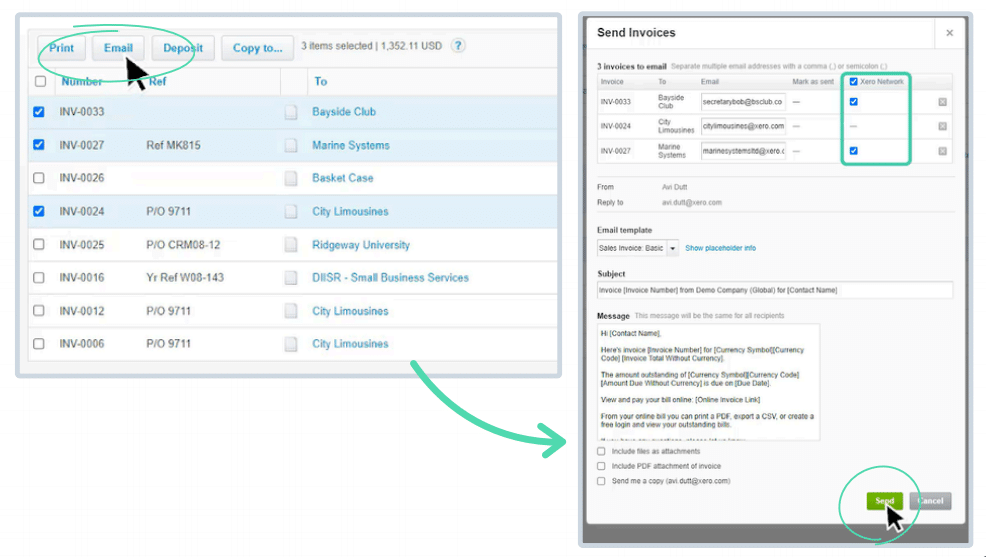
Xero to Xero invoicing allows businesses to issue sales invoices to the other Xero user’s company and leave a draft bill in their system. It eliminates manual entries and streamlines the handling of accounts receivable and accounts payable.
In order to make use of this feature, the two organizations must share their respective Xero Network Keys. These keys are entered into the contact details in Xero, and it establishes a secure connection between the two accounts. It is as easy as selecting the “Send via Xero Network” option when sending the invoice by email. The recipient receives an email notification, and the invoice is also shown as a draft bill in their Xero account, ready to be previewed and approved.
It is to be noted that invoices marked as “Awaiting Payment” with no discount or payment being made are the only ones eligible to be sent via this process. Further, no attachments to the invoice can be sent from Xero to Xero.
4. Manually add payments to an invoice
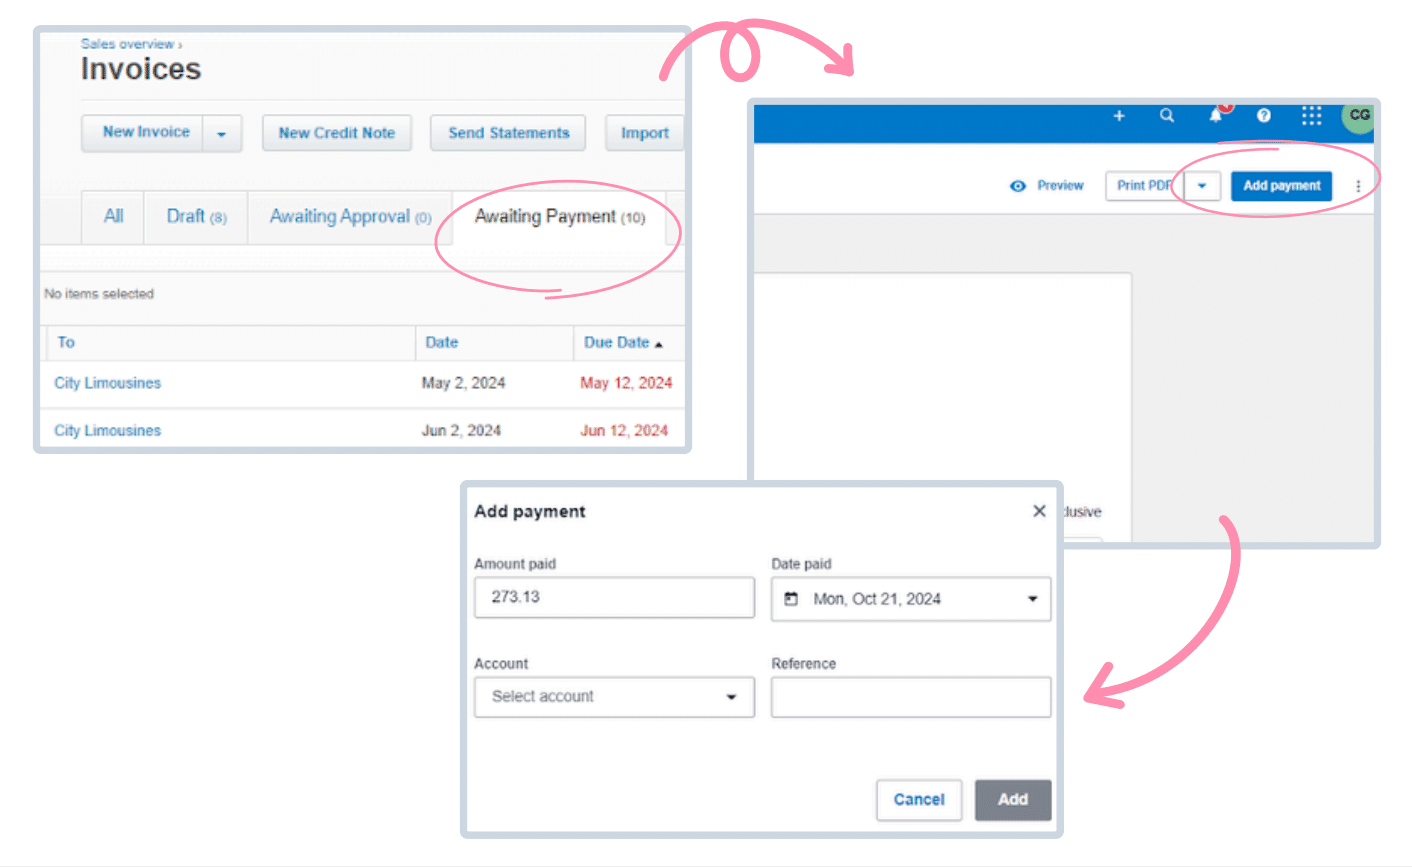
In order to record a payment from a customer, navigate to the ‘Awaiting Payment’ option under the Invoices menu. Click the right invoice to choose it and click the ‘Add Payment’. A click here will launch the window where you can record the payment.
Inside the payment window, you’ll need to specify, amount paid, date paid, payment method, and payment reference.
After providing the required details, press ‘Add’. The payment will be applied, and the status of the invoice updated accordingly. If the total amount is paid, the invoice will be moved to the ‘Paid’ tab. In partial payments, the invoice will remain in the ‘Awaiting Payment’ tab until full payment is made.
This manual addition of customer payments ensures proper customer payment tracking and keeps the accounts in Xero current.
5. Copy an invoice to save time
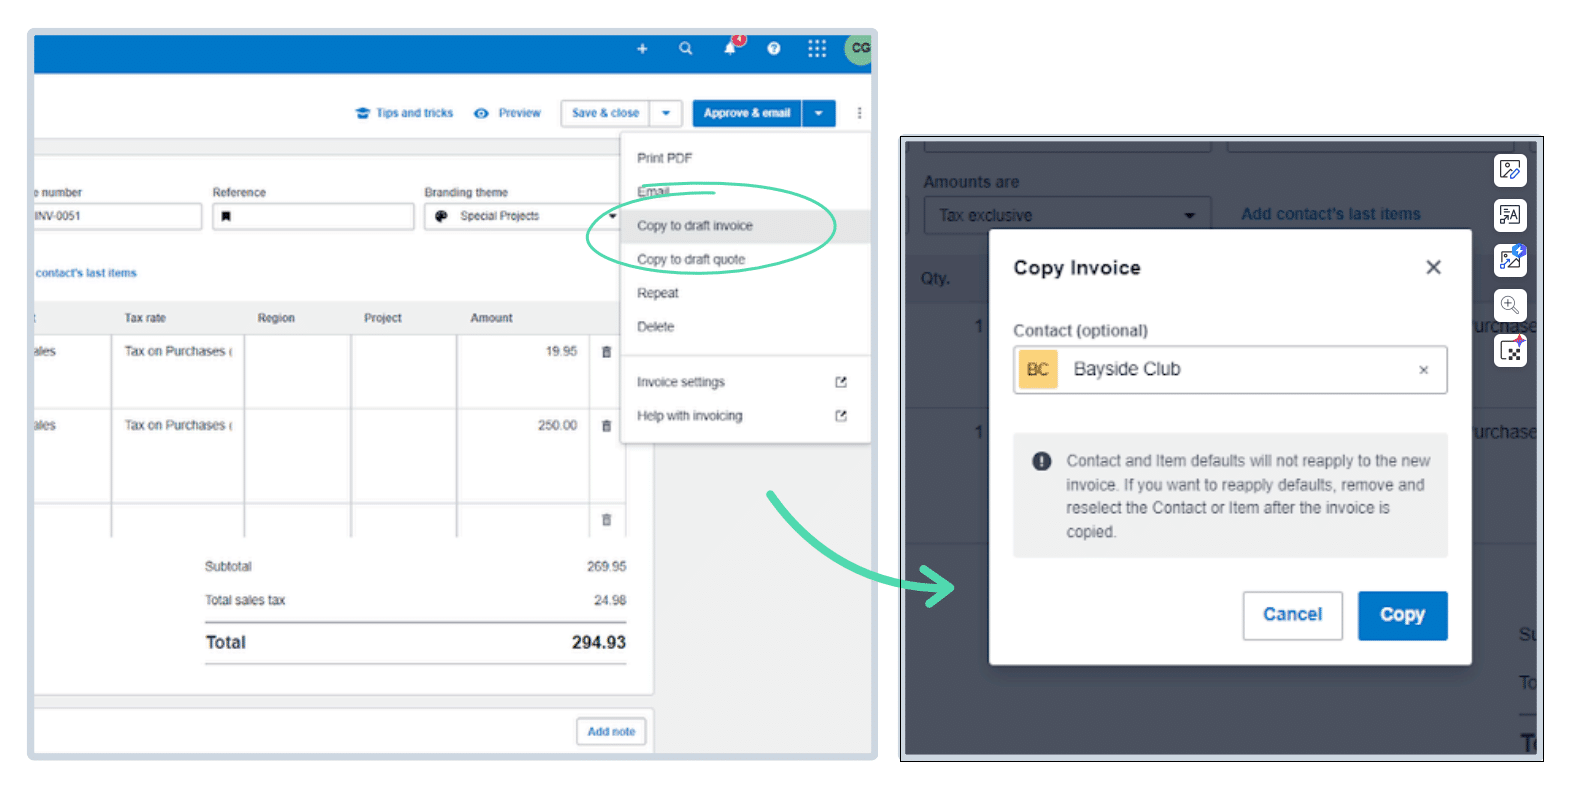
You can copy an invoice to create a new invoice, a quote, a bill, or a purchase order in cloud based software, Xero. To copy an invoice, go to the Invoices page and click on the status tab of the invoice. Choose the invoice that you want to copy. Click on the ‘Copy to’ button and select the option you prefer: Invoice, Quote, Bill, or Purchase Order.
Once duplicated, read the new document, implement any required changes, and then save or sign off on it accordingly. The process helps to ensure consistency and accuracy in your documents while also saving time and reducing manual data entry of daily accounting tasks such as recurring invoices.
6. Add new lines to your invoice
Type anything in any field on your line of the current invoice, and a new line will be inserted automatically.
7. Set an exchange rate directly from your invoice
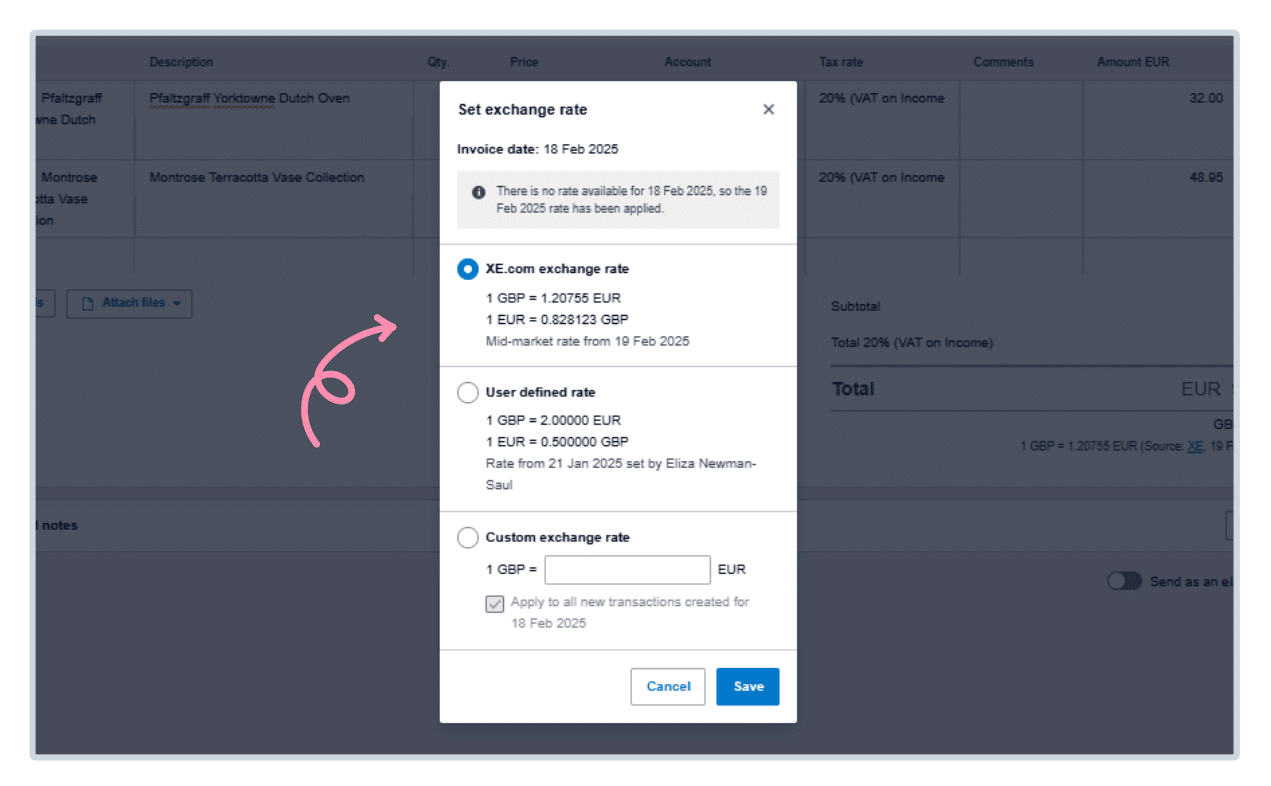
In Xero, you can also manually set the exchange rate of foreign currency transactions within the invoice itself. This is extremely convenient when you wish to utilize a specific rate your bank or a third party provides.
To set a particular exchange rate, open the invoice. Click on the “Set exchange rate” link, which is available for new invoices or unpaid invoices, bills, credit notes, and spend or receive money transactions. For purchase orders, navigate to “Edit” to view the exchange rate settings.
When you’ve arrived at the exchange rate part, select “Custom exchange rate” and enter the rate that you want to use. You can use a maximum of six decimal places to get as much accuracy as you need. If you don’t want this custom rate applied to all new transactions on the same date, clear the corresponding box.
8. Create new tracking options
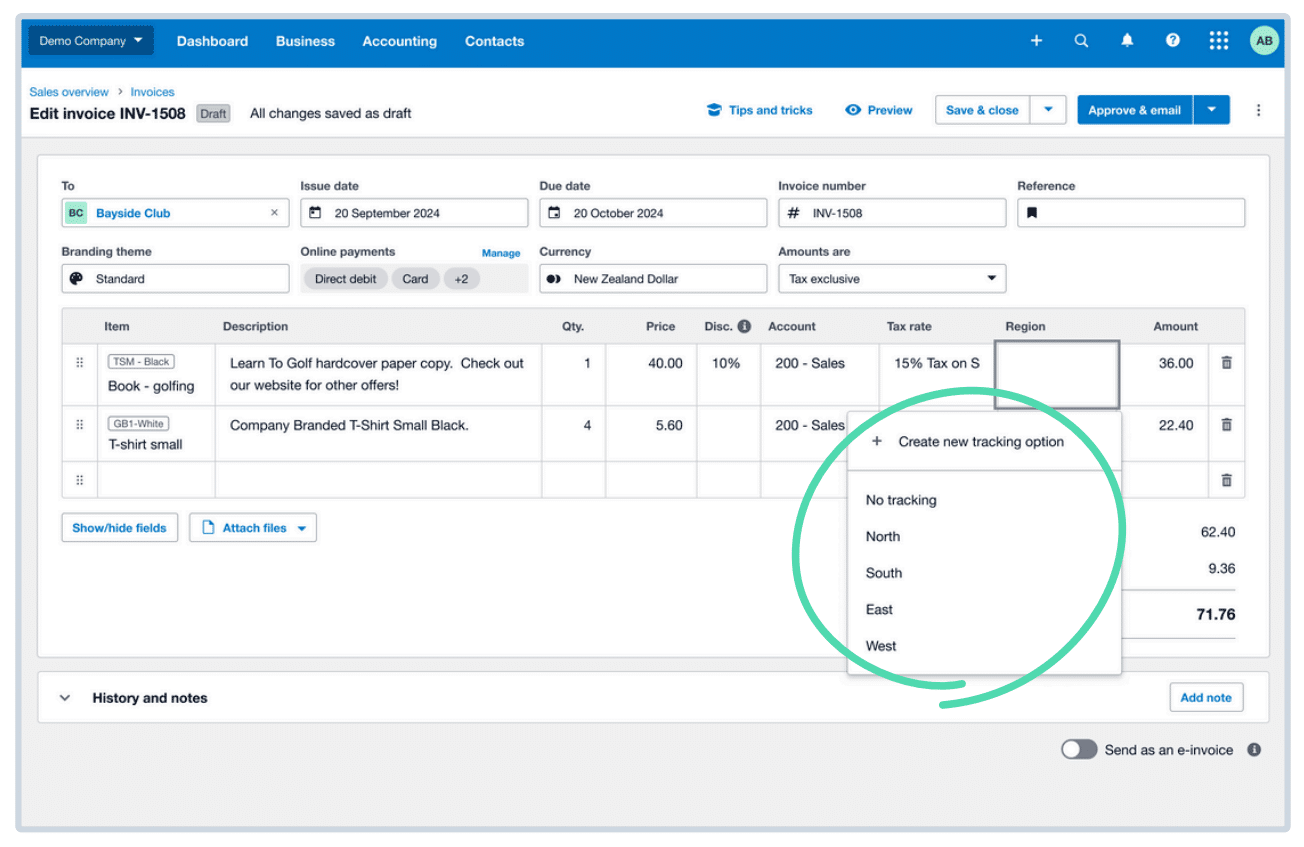
In Xero, you create tracking categories and options to easily track different aspects of your business, such as locations, departments, or cost centres. This allows for meticulous reporting and analysis to work smarter.
- Setting Up Tracking Categories and Options
Go to Settings and then choose Advanced. Select + Add Tracking Category. Enter a title for the tracking category, say, “Location” or “Department.” Within Category options, list the exact options that you wish to track, for instance, special shop locations or department names. Select Save to configure the tracking category.
- Assigning Tracking Options to Transactions
Once you have set up the tracking categories, they can be used in transactions like e-invoices, bills, and purchase orders. When you are creating or modifying a transaction, locate the Tracking section. Select the appropriate tracking category and the proper option from the dropdown menu. To create a new option, click + Add new tracking option, enter the new option name, and click Save.
- Best Practices
It is better to have 100 or fewer tracking options for every tracking category in order to get maximum report performance. You can have four tracking categories allowed by Xero, but only have two available tracking categories at once.
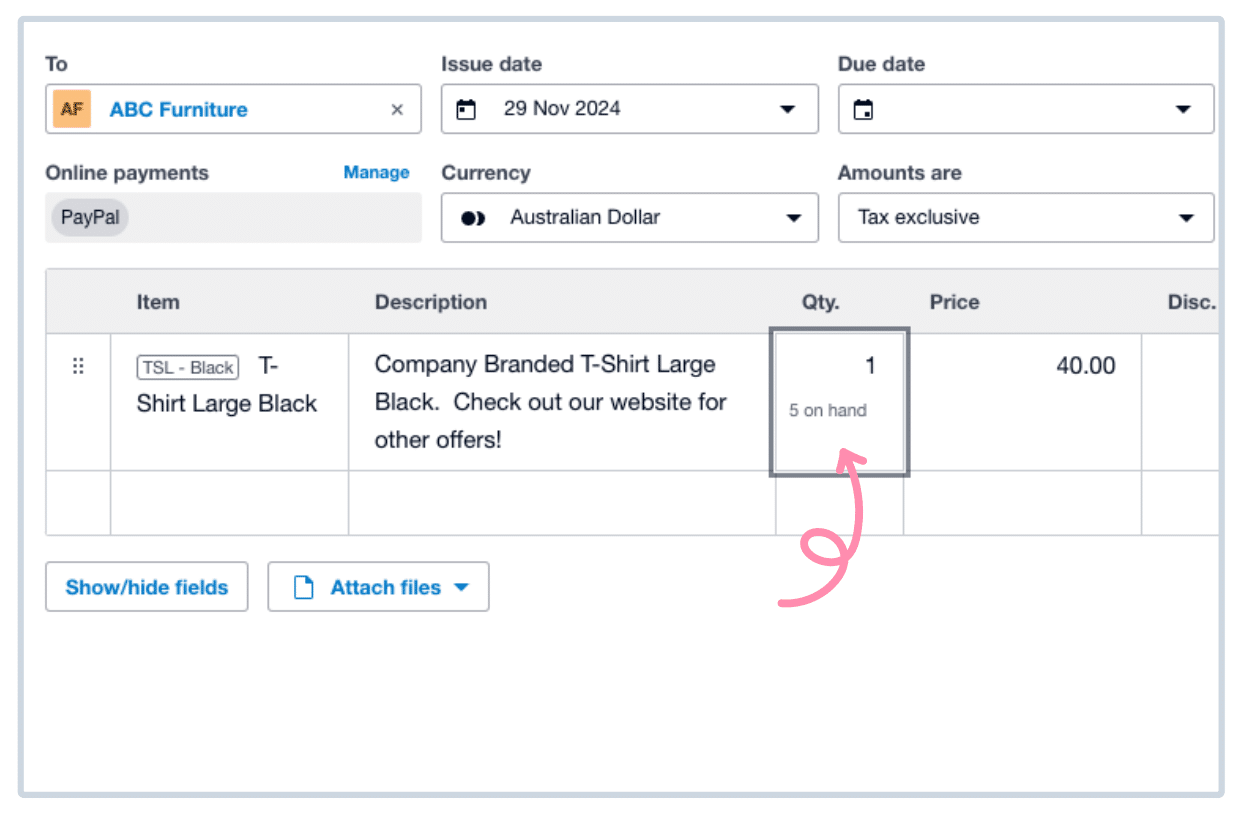
9. Stock on hand information
You are able to view your stock on hand quantities right within the invoice entry screen in Xero. This method keeps you from alternating between tabs or programs, keeping your process simplified.
- Managing Inventory in Xero
To effectively control your inventory, ensure you have switched on tracked inventory items for Xero. This allows the system to update automatically once you create and approve bills or sales invoices. Real-time stock levels can be viewed by accessing the ‘Business’ menu and clicking on ‘Products and Services’. The ‘Quantity on Hand’ column provides an up-to-date count of your stock on hand.
- Creating Stock on Hand Reports
For complete reporting, Xero offers the ‘Inventory Item List’ report. The report indicates the amount available and the sum value of a given item of stock as at a date of your choice, say, the financial year close. To access this report, go to the ‘Accounting’ menu, click on ‘Reports’, and seek out ‘Inventory Item List’. Once you open it, you can specify the preferred date and click ‘Update’ to generate the report.
- Managing Inventory Adjustments
Occasionally, you might need to adjust your stock due to discrepancies, breakages, or otherwise. Xero allows you to make these adjustments directly within the ‘Products and Services’ area itself. Click on the product whose adjustment you are making, choose ‘Adjust Inventory’, enter the new amount, and save the adjustment. You can be certain your stock is accurately represented and updated.
By leveraging these abilities, Xero, a cloud software, allows you to have accurate and current visibility of your on-hand inventory, enabling better management of your stock and good decision-making.
Check on the blog -> 2026 7 Powerful Financial Reporting available in Xero
About Xero
Xero is a global small business platform with 4.2 million subscribers. Xero’s smart tools help small businesses and their advisors to control core accounting functions like tax and bank reconciliation, and complete other important small business tasks like payroll and payments. Xero’s extensive ecosystem of connected apps and connections to banks and other financial institutions provide a range of solutions from within Xero’s open platform to help small businesses run their business and control their finances more efficiently.


