In Malaysia, businesses must submit e-invoices and self-billed e-invoices to the Inland Revenue Board (LHDN) in compliance with the latest e-invoicing regulatory requirements. Xero, a leading accounting software, provides seamless integration with the MyInvois portal, simplifying the submission process and helping Malaysian businesses ensure compliance with these regulations.
This guide walks you through the process to submit e-invoices and self-billed e-invoices with Xero, ensuring tax compliance and streamlining your invoicing procedures.
1. Understanding E-Invoices and Self-Billed E-Invoices
E-invoices are digital invoices businesses send to customers, while self-billed e-invoices are generated when the buyer issues the invoice on behalf of the supplier, typically in cases where the supplier does not issue one.
Both types require submission via two methods with Xero’s automated system:
- Individual e-invoice submission.
- Consolidated e-invoice submission.
Due to Malaysia’s mandate, SMEs have been granted a 6-month interim relaxation period to adopt e-invoicing technology. During this period, businesses are required to submit only consolidated e-invoices and self-billed e-invoices. After the relaxation period, individual submissions will be required, though industries like Food & Beverage may continue submitting consolidated e-invoices due to high transaction volumes.

2. What is Xero’s Role in Submitting E-Invoices and Self-Billed E-Invoices?
Xero helps businesses in Malaysia automatically generate e-invoices and self-billed e-invoices, ensuring compliance with MyInvois classification codes and LHDN regulations. With its integration into the MyInvois portal, Xero allows businesses to eliminate manual data entry, ensuring accuracy and compliance.
3. Step-by-Step Guide: Setting Up Integration Between Xero and MyInvois Portal
Step 1: Set Up Your MyInvois portal
Ensure your Xero account is connected to MyInvois. This involves linking your Xero account to the MyInvois portal, which handles the electronic submission of invoices to LHDN.
You must be registered as a taxpayer with MyInvois. Visit MyTax and log in to complete your registration.

You may use the following details to proceed:
- TIN: C59738971030
- BRN: 202401051638
- Name: XERO SOFTWARE (MALAYSIA) SDN. BHD.
Step 2: Verify Business Information with Invoici and Set Up Your Xero Account and MyInvois Integration
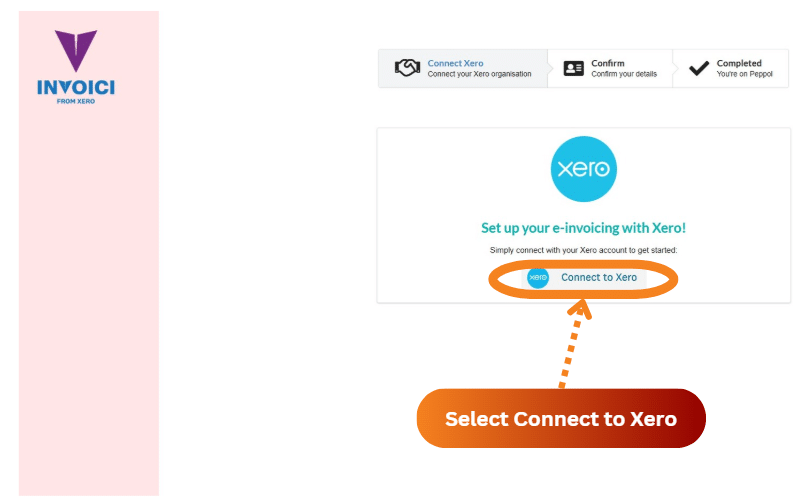
Visit Invoici Integration, you will see the screenshot as below:
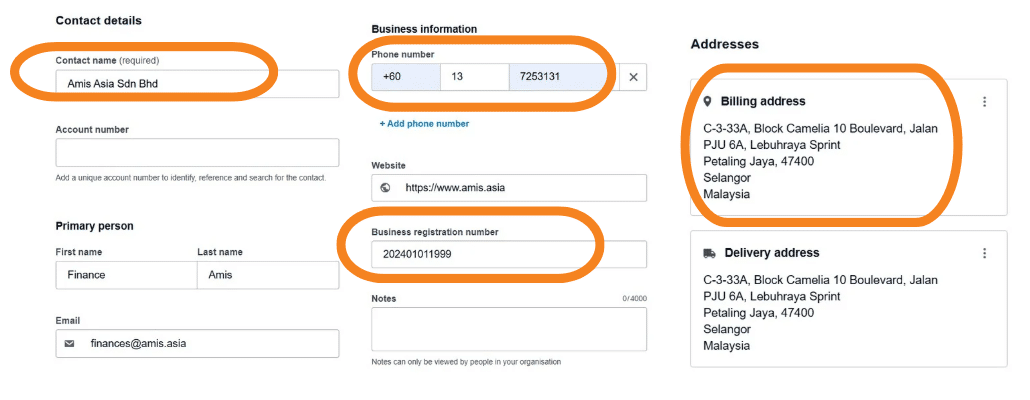
Ensure all necessary details about your business are updated in Xero, such as your business name, Tax Identification Number (TIN Number), Business Registration Number (BRN) . This is important for correct invoicing and reporting.
Step 3: Finalize Your Xero E-Invoice Setup
Once linked to Invoici, Xero will create the necessary tracking categories for your invoices and two contacts for future submissions to LHDN. Ensure the tracking category is set up for sales invoices and self-billed invoices.
Other than that, Xero will create 2 new contacts in your Xero account. Please note that each contact comes with the specific email address that submit directly to Lembaga Hasil Dalam Negeri (LHDN) in the future.
4. Essential Setup for E-Invoices and Self-Billed E-Invoices in Xero
Step 1: Understand LHDN’s Required Fields for Supplier and Buyer Details
LHDN mandates 35 required fields for e-invoices. Ensure that fields such as Company Name, Tax Identification Number (TIN), and Business Registration Number (BRN) are filled in accurately for your customers and suppliers.
Step 2: Complete Customer and Supplier Information in Xero
Ensure all necessary data for customers and suppliers is entered into Xero. This includes Company Name, Contact Number, Business Registration Number (BRN), Business Address, Tax Identification Number (TIN Number) and Sales & Service Tax Number (SST Number).
Preset classification codes to automate data entry during invoice creation.
Step 3: Stay Updated with LHDN Requirements
Regularly consult with an e-invoicing consultant to stay informed about any changes in LHDN’s requirements.
5. What You Need to Do in Xero in Daily Operation?
There are two types of submission methods for e-invoices and self-billed e-invoices:
- Individual E-Invoice and Individual Self-Billed E-Invoice
- Consolidated E-Invoice and Consolidated Self-Billed E-Invoice
During the 6-month interim relaxation period, businesses must submit consolidated e-invoices and self-billed e-invoices by the 7th of the following month to avoid penalties. After the relaxation period, individual submissions will be required for most businesses, though industries with high transaction volumes, such as Food & Beverages, may continue submitting consolidated e-invoices.
6. How to Submit Consolidated E-Invoice and Self-Billed E-Invoice with Xero?
Upon completion of your daily operation in tagging the correct tracking category for e-invoices and self-billed e-invoices purposes, this is what you need to do in Xero:
Step 1: Automatically Generate Consolidated E-Invoices
On the 4th of the following month, Xero will automatically generate your consolidated e-invoice and self-billed e-invoice based on tagged invoices.
Step 2: Validate and Review Generated Invoices
Once Xero generates the e-invoices and self-billed e-invoices, validate that all the necessary line items and tax rates are correctly applied. It is essential to check that all sales invoices and credit notes are included, and ensure that the tax rate is appropriate (e.g., 8%, 6%, or 0% for self-billed e-invoices).
Step 3: Submit E-Invoice via MyInvois Portal
After reviewing, submit your consolidated e-invoice and self-billed e-invoice to MyInvois Portal via Xero. This submission is electronically done, ensuring full compliance with LHDN’s e-invoicing requirements.
For more detail guidance, please visit to our blog – 10 Essential Steps to Submit Consolidated E-Invoice in Xero Effortlessly
7. How to Submit Individual E-Invoice and Self-Billed E-Invoice with Xero?
Step 1 – Issue and approve an Invoice in Xero as usual
Create your invoice as usual in Xero, selecting the appropriate MyInvois Classification Code based on your business type.
Step 2 – Submit the Invoice to MyInvois Portal for Validation
Submit the invoice to the MyInvois portal for validation.
Step 3 – Use the Correct Email to Connect with LHDN
Submit the invoice to myinvois@invoi.ci, where the invoice will be validated.
Step 4 – Check the Validated E-Invoice in Xero
Navigate to the invoice in Xero to see the validated e-invoice as an attachment.
Your invoice has now validated, this is how a validated e-invoice looks like in Xero!
Step 5 -Send the Invoice to Your Customer
Finally, send the validated e-invoice to your customer, with the validated invoice appearing as an attachment in your email via Xero’s messaging service.
This is your customer’s view when they received your email through Xero. Now the whole process of submitting individual e-invoice has completed.
8. What You Need to Implement Xero E-Invoicing
Before submitting your e-invoice and self-billed e-invoice with Xero, you will need:
- An active Xero account.
- An active MyInvois portal registration.
- Updated business information.
- Internet connection for seamless integration with LHDN’s e-invoicing system.
- Engage a Xero Partner to provide you e-invoice implementation services to support you to stay compliance. Talk to us now for more info!
9. Common Mistakes to Avoid When Submitting E-Invoices in Xero
When submitting e-invoices and self-billed e-invoices, there are a few common mistakes businesses often make that can lead to errors or delays:
- Missing or incorrect data entry: Ensure that all details, including unit prices, line items, and tax rates, are correctly filled in before submission.
- Incorrect categorization: It is essential to assign the right tracking categories to ensure the e-invoices comply with MyInvois classification codes.
- Not validating invoices before submission: Always review your generated invoices to ensure everything is accurate, especially the total amounts and tax rates.
Conclusion
With Xero, submitting e-invoices and self-billed e-invoices becomes a streamlined, automated process, ensuring compliance with LHDN’s regulatory requirements. By following these simple steps, Malaysian businesses can save time, reduce errors, and ensure accurate tax filings.
About Xero
Xero is a global small business platform with 4.2 million subscribers. Xero’s smart tools help small businesses and their advisors to control core accounting functions like tax and bank reconciliation, and complete other important small business tasks like payroll and payments. Xero’s extensive ecosystem of connected apps and connections to banks and other financial institutions provide a range of solutions from within Xero’s open platform to help small businesses run their business and control their finances more efficiently.


